
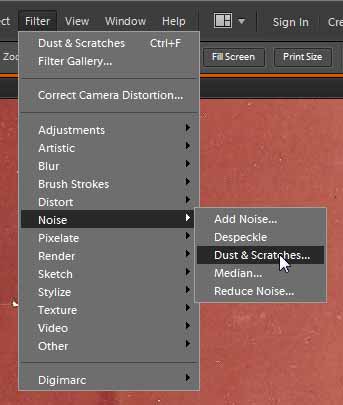
Go to Filters > Noise > Dust and Scratches. I've already witnessed somebody attempt to use this Filter to ADD Dust and Scratches. Nope, sorry. The only filter that does not have a reparative function on this menu is Add Noise. To make a photograph dusty and grungy, you will need a whole set of new skills!
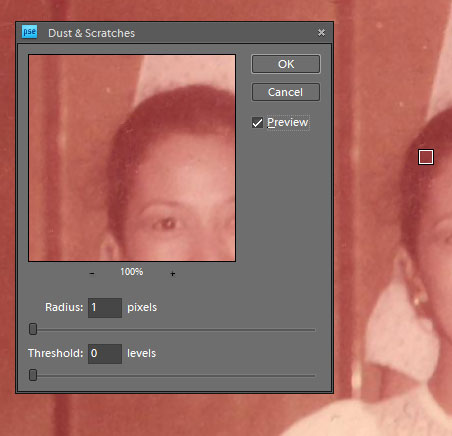
Anyway. You start out with this dialog box. The mouse pointer turns into a square. You can use it to change the image area that is shown on the preview box. The preview box will always show the result of the Dust and Scratches process, even when the Preview checkbox (on the right) is turned off. When it's turned on, the main image behind the dialog box also shows what will happen after the process. Always start with both Radius and Threshold turned all the way to the left.
What does Radius and Threshold mean? Radius is essentially the strength at which Photoshop rubs out the specks. Threshold is the level at which Photoshop determines whether or not a speck is considered noise or not (at which point, it will ignore it and not try to rub it out). A value of 0 means it will consider most specks as noise, and the higher the number, the more forgiving it is of little specks.
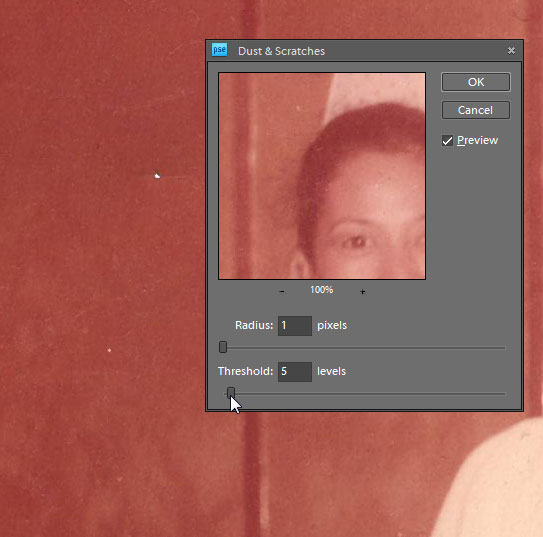
(1) Turn up Radius until the specks that bother you disappear. Already at Radius 1, I'm satisfied with the cleanliness of the image (you'll see why you don't turn it up all the way in a bit). (2) Turn up Threshold until just before the specks make their comeback on the preview window. I reached a Threshold of 5 for this image. Any higher and too many of the specks come back.

Click on the image to enlarge.
Why didn't I crank up the Radius and keep the Threshold low so that the image is totally spotless? Photoshop makes no distinction between scratches and fine details that might be considered important to the image. For example, you can see that it thinks the highlights in my aunt's eyes are dust particles, and it rubs them out. Depending on how much you want to preserve the image (which I think is the most important part of all), it's always better to under-correct than overdo it and lose data forever. By keeping the Dust and Scratches at a low Radius and high Threshold, it leaves big dust particles and scratches intact, but you can use other tools (in future tutorials) to erase them without sacrificing the fine details of the image. However, if the image is extremely dusty and there are few fine details, Part 2 of this tutorial will discuss how to easily clean up the image.

Click on the image to enlarge and see the improvement.
The finished product, after clicking OK. Notice that I left the big scratch on the left. It's even smaller than the highlights in my aunt's eyes, so any use of the filter to erase it will also erase my aunt's highlights. We'll use other tools to remove these, in future tutorials.


